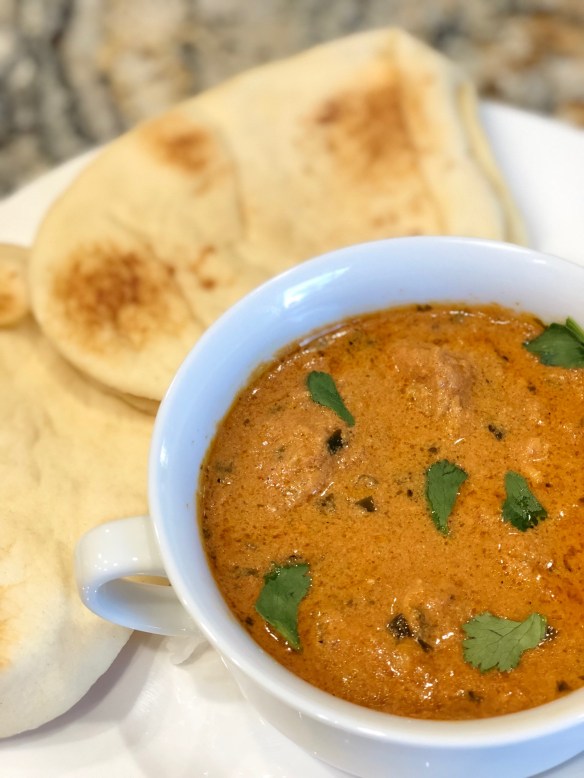
How Cool is Your Pantry?

March 10th, 2010

I’ll be the first to admit that my large pantry, the one in the basement that holds long term storage items and all of my canning and drying, is decidedly uncool. My house is more than 70 years old and that room has never been finished. It served as my grandfather’s workroom for the 40-odd years he lived in the house. It has walls and a floor of cement.

My grandfather built the storage shelves in my pantry. One narrow wall has floor to ceiling shelves. Along one of the long outside walls is a counter-high shelf of wood where my grandfather tinkered. A vice is nailed on one edge of the counter while a polisher is still affixed to its surface. The wall opposite has three shelves that run along the majority of it, again topping out at waist high. The final, narrow wall has no shelves. The whole space is about five feet wide and ten feel long. It has ample space.

The room has an outside window, and interior window that faces the furnace (I think the interior window was built to bring light into the center of the basement), and a door. The ceiling is open to the joists.

Where my pantry becomes cool is in how I’ve recently learned to manipulate the temperature in the room. Simply closing the door when I leave the pantry has dropped the temperature to 60 degrees or less. Food stores best in cool, dark, and dry spaces. Keeping the temperature low keeps the food longer. When I go inside the pantry in bare feet, I actually get cold. There is a significant drop in temperature between the pantry and the laundry room, which is just outside it.

I also covered the two windows with cardboard to keep out the light, again making the space cooler and better for storage. While I have to turn on the light each time I enter (about five times a day!), I’m giving the best conditions I can in which to store food.

So yes, my pantry is uncool in aesthetics, but very cool in terms of keeping food in optimal conditions.

Dreaming of Summer—A First Look at the Garden

March 9th, 2010

Yesterday was particularly spring-like, with warm weather and a light breeze. It brought the reminder of the glories of spring and the rebirth of the garden.

I took a few minutes to walk through the remainder of last year’s vegetable garden to see how it looked after a long winter and the work of the roofers was finished. The rhubarb plant had tiny green leaves and bright red stems. It looks like it made it through its first winter and was ready to spring upward. The leeks and shallots that I left in the ground were hearty and fatter than they were last fall. I’ll pull a few and see what they taste like. The garlic I planted last fall had three-inch tender green shoots, and if they keep growing at this rate, should make for a good harvest in June.

Earlier in the day I had read an article in the newspaper about saving seeds. It warned that if crops have failures, seeds will be harder to obtain the following year. The writer predicted that seeds will be in short supply again this year as more people turn into urban gardeners. He finished the article with advice about harvesting and storing seeds. While I’ll save this article, I wish I would have read it in the fall when I simply pulled seeds from plants and let them air dry. This fall I can take a more scientific approach to my harvesting and storing.

I wrote previously how my nephew gave me seeds for a variety of heirloom tomatoes. I returned the favor last week by giving him a selection of melon and squash seeds.

Right now the garden is only in my mind. But in the next day or two, I’ll finalize my plans and plant the seeds into tiny pots and growing in the sunniest corner in my kitchen. For me, watching seedlings sprout is one of the best signs that spring is in the air.

What Should Be in a Pantry?

March 8th, 2010

When friends find out that my husband and I go a few months without grocery shopping, they frequently (after gasping) ask what we eat. They think that we must be starving ourselves. But we actually live quite regularly.

About 40% of items in our pantry have a long shelf life of five years or longer. They are items that are generally less processed foods. These items include rice, wheat, oats, dried beans and peas, lentils, barley, cornmeal, dehydrated fruits and vegetables, sugar, honey, flour, salt, and dried milk. Flour, dried milk, oats, and cornmeal push their freshness at five years. However, if they are packaged properly, they can store that long. These staples are the basis of our eating. From them we can make bread and cookies, breakfast cereals, and soups and main dishes.

I also believe this is the most important aspect of a well-stocked pantry. It makes up the majority of food stored which is also the most nutritiously dense. Because the food is less processed, it also makes it less expensive to buy. Use this food as part of your pantry so that you become accustomed to it. I don’t recommend starting a diet solely of whole wheat, oats, dried fruit, and beans unless you have been introducing them already into your diet.

The second category of food would be that which comes from the garden or butcher and is canned, frozen or dried and makes up 35% of a well-stocked pantry. If you aren’t a gardener, you can acquire produce from a CSA or farmer’s market. If you don’t want to do it yourself, this is where sales at the grocery store come into play. Fruits and vegetables round out the beans and grains from the previous category.

Most home-preserved or frozen food is best used within 12 months (the vitamins and minerals begin to fade), although it can store much longer. Having 35% of food stored from the garden gives variety to what’s in the pantry while adding flavor and additional nutrients. Since these food items don’t store as long as the bulk items in your pantry, using them throughout the year gives you a chance to clear them out before then next gardening season comes along.

Meat purchased at the store or from a local farmer fits into this category. So does butter, cheese, and juices which are stored in the freezer.

The third category of stored food, comprising about 25% of items, should those that are commercially prepared and have a shorter shelf life. These food items can be anything from canned soups, oils, nuts, canned meat, boxed mixes, commercial cereals, and spices. This is the food that may not be as nutritionally valuable as other food you have stored, but it puts flavor and variety into a diet. It’s also a place to put favorite or treat foods like chocolate or trail mix.

Another way to look at this is similar to the old food pyramid. The base of the pyramid (40%) should be the bulk items, the middle area is garden produce and meat and dairy that can be frozen. The top would be commercially prepared food that is less nutritious but adds flavor and variety.

Having a well-stocked pantry means having a variety of food, from items that can last for years to comfort food. The trick is to buy what you use, then use what you have and replenishing as needed.

What do you keep in your pantry?

Pantry Challenge and Blog Hiatus

February 26th, 2010

I’m traveling the next week and won’t have much access to update the Pantry Diva. Also, because of my time away from home I won’t be cooking from the pantry. But because I’m taking a week away from cooking, I’m adding a month to the challenge.

I have more than a year’s worth of material on the site. I suggest that you spend some time looking through older posts until I can get back to a regular schedule.

Southwest Rice and Bean Skillet

February 25th, 2010

Last week I ran across a recipe at Prevention Magazine that used a lot of ingredients from the pantry and promised to be easy and flavorful. I tried it last night for dinner and wasn’t disappointed. It also came together rather quickly once the rice was cooked.

I tweaked it in a few places based on what I had on hand and what I thought would improve it. It also could be made without meat for a vegetarian option. The citrus adds a bright note. Here are the results.

Southwest Rice and Bean Skillet
1 ½ tablespoons olive oil
5 cloves of garlic, minced
8 oz. cubed of meat of your choice (shrimp, beef, pork, or chicken)
Juice of one lime
1 tsp. dried cilantro (optional)
Dash of hot sauce
3 cups cooked brown or white rice
1 can black beans, drained and rinsed
1 cup salsa
½ cup shredded cheese

1. In a large skillet, warm the oil. Add the garlic and cook, stirring, about 1 minute or until fragrant. Add the meat and cook, stirring 2 to 3 minutes or until it begins to brown. Stir in the lime juice, cilantro, and hot sauce, and cook another minute.

2. Stir in the rice, beans, and salsa. Reduce the heat to low, cover, and cook about five minutes or until the meat is cooked through.

3. Remove from heat and sprinkle with the cheese.

Next Steps in Green Living

February 24th, 2010

This week I’ve been working around the tap, tap, tap on my roof. Well, make that the pound, Pound, POUND! Our roof was aging and had three layers of old materials. We’ve been saving to put a new roof on the house and the work began this week.

In addition to the roof showing its age, we’ve wanted to install a couple of solar panels on the roof. Our hope is that the panels will supply us with all of our hot water needs and perhaps augment our hot water heating system. My husband has been working with solar energy and installing it in other’s houses. He didn’t want to put it in our house with the old roof, knowing that the panels would have to come down to reroof the house. So we’ve bitten the bullet and gotten a new roof too. I’ll keep you updated about our energy savings.

I’ve also made some changes to my working habits. As a college professor, I have students write five short papers each semester. With a full class or two, that adds up to perhaps a ream of paper per class that gets used to print off those papers that I read and return. It doesn’t save a lot of paper, but it’s still a start. Now I have the papers sent to me by email, which I then correct electronically, and send back.

Sometimes going green can take more resources of other kinds. It also takes a bit of advance thought and planning. Yes, our house needed a new roof. But the solar panels will cost us additional money. Grading papers electronically takes a little more time, but it uses less paper. It’s all a trade off and keeps my eyes focused on the bigger picture of living in a more sustainable environment.

Broccoli and Garlic Penne

February 23rd, 2010

I have two books from the Silver Palate cookbook series in my arsenal of recipe books. The authors, Julee Rosso and Sheila Lukins, created quite a sensation in the1980s with their books and line of food products. I keep these books around because most often I find that the recipes almost always yield good results. While not necessarily oriented toward health or ease, they taste good.

Last night I pulled out “The New Basics Cookbook” and made Broccoli and Garlic Penne for the first time in years. This recipe cooks up quickly although it requires three pans and a colander, so the time you save on cooking will go to clean up. It also has a fair amount of fat, which you could probably reduce. Best of all, it relies on simple ingredients that are found in the pantry or most refrigerators. You could probably substitute frozen broccoli without too much loss of flavor.

Broccoli and Garlic Penne

1 pound penne
2 heads broccoli
¾ cup extra virgin olive oil
10 large cloves of garlic, thinly sliced crosswise
Freshly ground black pepper, to taste
4 tablespoons (½ stick) unsalted butter
½ cup freshly grated Parmesan cheese

1. Bring a large pot of water to a boil. Add the penne, and cook at a rolling boil until the pasta is just tender. Drain, rinse under cold water, drain again, and reserve.

2. Cut the broccoli florets into fairly small pieces. Reserve the stems for another use. Bring a large saucepan of water to a boil. Add the broccoli, and simmer for 2 minutes. Drain, rinse under cold water, pat, dry, and reserve.

3. Pour the oil into a large skillet, and heat over medium heat until it begins to ripple, about 1 minute. Add the garlic slices and cook, shaking the pan, until the garlic begins to brown around the edges, another minute.

4. Add the broccoli to the skillet, stir well, sprinkle with black pepper, and cook 2 minutes longer, shaking the skillet.

5. Add the butter and penne to the broccoli and cook, stirring often, until the penne is well mixed with the hot broccoli, oil, and garlic and the mixture is hot—3 to 4 minutes.

6. Place in a serving dish, sprinkle with the Parmesan cheese, and serve immediately. Pass the pepper mill.

8 portions.

Pantry Challenge Extended

February 22nd, 2010

After the third week of this year’s challenge, we’ve finished off the fresh pears and grapefruit. I’ve been using powdered eggs in baking to preserve the fresh eggs that we have. The potatoes are starting to get small sprouts in their eyes. We’re doing fine. We had a dinner party for six and we substituted instant mashed potatoes for fifty percent of the mashed potatoes we served with no change in taste and texture. I took a cake, made from scratch, to a funeral. We didn’t eat out once.

And we’ve decided to extend the challenge another month, so we won’t be shopping until May 1. I think we can make it. We’ll get very creative about what we eat during the month of April. We have enough food stored and it will give us a good chance to get our freezer emptied just a month or so shy of the garden produce rolling in. My husband suggested that next year we shoot for four months. I think we need to see how we fare after three months before making that decision. But I’m thrilled to have his support.

I’ve discovered a couple of other bloggers who are eating from their pantries as well. http://www.theprudenthomemaker.com is married to a realtor in Las Vegas and has been using stored food and a home garden since 2007 to keep her family fed. Crystal Young of Omaha is a mother of ten and is also going three months relying on stored food to feed her family. Her blog is at www.3monthspreparation.blogspot.com.

I don’t know if this is a national trend, a test of self reliance, or a sign of difficult times, but living off stored food makes interesting reading, practice, and introspection.

How long could or would you go on your stored food? And why would you do it?

What Gives a Challenge its Edge?

February 19th, 2010

This year’s Pantry Challenge doesn’t seem to be quite as challenging as last year’s. Part of it is that traveling takes some of the challenge out of not shopping for two months. I was gone for four days last week. And I’m going out of the country for a week the first week of March. It means that meals are often eaten out and less time is spent relying on the pantry shelves to keep us fed.

Another aspect that has given this year’s Challenge less luster is that we have an idea of the outcome. Last year we wondered if we could do it. We outdid our goal of going for one month without grocery shopping and instead went two months. We didn’t starve. We learned a lot. And we prepared for this year’s Challenge by planting a good-sized garden and knowing in advance that we would be doing this again.

So last night I was talking this over with my husband. He suggested that we extend the Challenge another month and shoot for three months without grocery shopping. In thinking about it, it wouldn’t be that difficult to do. It just stretches out the time frame. What the challenge does is teach us to maximize what we have and make adjustments when we need to make do without.

That’s not a bad lesson to learn, either inside or out of the pantry.

The jury is still out about whether or not we’ll go an extra month. But I think we are up to the challenge.

Mushroom, Barley, and Lentil Soup

February 18th, 2010

Day 17 of the challenge saw me with a leftover chicken carcass and mushrooms that were getting on the edge of freshness. So I pulled together a pot of soup and made a loaf of light whole wheat bread. The results were very satisfying.

Here’s how I made the soup:

Mushroom, Barley, and Lentil Soup

Cooked chicken carcass
Leftover chicken drippings or gravy
¼ cup dried onions*
¼ cup dried carrots*
¼ cup dried celery*
¼ cup white wine
3 cups water
¼ cup barley
¼ cup lentils
1 tsp. dried sage
1 tbs. olive oil
2 cloves of garlic, minced
1 onion, diced
2 stacks of celery, chopped
8 oz. mushrooms, chopped
1 tbs. soy sauce
Salt
Pepper

• Remove chunks of meat from the chicken carcass. Place bones, skin, remaining chicken drippings or gravy, and dried carrots, celery, and onion in a medium stock pot. Add water and wine and bring to a simmer. Cover and cook for 45 minutes to an hour.

• Allow chicken to cool, and then strain the solids from the stock. Cool stock and skim any congealed fat.

• Bring stock to a simmer and add the barley, lentils, and dried sage. The total cooking time for the barley and lentils is about 45 minutes.

• While the lentils and barley cook, heat the oil in a sauté pan. Add the garlic, onion, celery, and mushrooms and cook until translucent and the mushrooms have released their liquid, about ten minutes. Season with salt, pepper, and soy sauce.

• Add the sautéed vegetables to the stock pot and finish cooking until the barley and lentils are tender.

• Once the soup has finished cooking, you can add the chicken that was removed from the carcass, or save it for another use. Add the chicken at the end of the cooking process to preserve its flavor and texture. Cook only until the chicken is thoroughly heated.

* If you don’t have dried vegetables on hand, use twice the amount of fresh ones as a substitution.

Serves two.